Tuesday, August 3, 2010

Building a CMVS - Part 2

So now that the Neo Geo arcade had its awesomeness ratio upped to "super awesome", I was ready for the next thing : the Supergun/CMVS (I refer you to the Wikipedia entry on supergun for more details : http://en.wikipedia.org/wiki/SuperGun, CMVS means Consolized MVS, which is the name of the arcade version of the Neo Geo).

I had to choose between the Supergun or the CMVS but when I saw a Neo Geo board for cheap (35 shipped), I had made my choice.

When you consolize a MVS, you mainly need 3 things:
  • A MVS board (check).
  • A power supply. I acquired a couple with the correct rating last year so I was already set for that (check).
  • A video encoder (not check).
Video encoders are why this projects can get expensive. Unless you're willing to build one yourself, you have to get this from one of the three following source:
The JRok and Neobitz encoders are now able to output component (which is the last step before HDMI) so obviously, they command a higher price. I first contacted JRok and after one reply, he never contacted me back. Either my emails were sent directly to spam or I was asking too much questions. Y-Plus sell only a composite/s-video encoder, which is why it's cheaper.

So I went with the Neobitz encoder. I got better service from him and the board arrived while I was on vacation (good thing it's small, it was in the mailbox, not on my front door step). Shipped, that small thing was 100$ US.

The last thing I was missing was a controller. Another good thing about MVS boards is that some of them come with controller connector, like SNK was expecting people to use the board in different way than in an arcade cabinet. So ordering a controller on eBay was not too difficult, the only issue I had was that I payed more for shipping than for the controller itself.

Once you have all this, you still need a couple of things, but nothing that can't be found at your local part store (I go to http://www.active123.com/ for most of my stuff, except LEDs, one LED for 5$ is not a good deal).

Here's a final picture with everything needed. The Neo Geo cart is kind of a given, since you do need something to test. The output connectors were included with the video encoder so that was nice as I didn't really want to make a Digi-Key order (I find their order system to be a pain if you don't have the part number).

Of course, the board was first tested in my own arcade cabinet and once I was satisfied with it (took 30sec), I was ready to start building !

And that will all be covered in the next post !

Building a CMVS - Part 1

Yeah, new post ! Took me less time to post something than the previous times (we're talking June 2009 to March 2010).

So recently I sold a bunch of stuff on eBay and held off on buying new shiny things for my collection. So once I had enough money in my Paypal account, I went for it: finishing projects that I pushed for too long !

First off was the translucent arcade buttons. This is something that i had pushed back for a long time since it's only a cosmetic thing. I've been wanting to change the buttons of my Neo Geo arcade for so long and after seeing the translucent buttons, I thought it would be cool to have buttons that light up. You can't deny the awesomeness of those buttons.

While the concept is fairly simple, doing was another thing. The quality control on these buttons is not the same as the regular Happ buttons (even if they come from the same mold). You also have to consider that the type of plastic/vinyl used to make the buttons is weaker than a regular plain color buttons. Translucent = weak. The color also affect the weakness. Yellow is the worst, followed by blue.

Anyway, on to the project itself. I first decided that I wanted these to run of the 5V line already coming from the main power supply, no battery or external output. That would have been too much pain just to do that. Using a LED array wizard (http://led.linear1.org/led.wiz), I was able to figure build the needed circuit (it was mainly to know which resistor I needed to use).

One the circuit done and the buttons received, the rest was easier said than done. I installed the buttons and with my drill (I rarely used a Dremel anymore since the holes are all of the same size of an existing drill bit), I made a hole in the bottom and inserted a white LED. Then I soldered everything back to the small circuit, connected everything to the main Jamma connector and I was DONE !

It looks great and I like it. Next : the real CMVS !

Monday, March 29, 2010

Guncon vs Justifier, an uneven match

To follow up on the driving controllers versus, I compared the most common non-standard controller ever known to man : the gun controllers. Once again, I went with the hardware I have in my collection.

The early game systems were mostly one-sided in the controller category. You only have to think about the NES Zapper, the SNES Super Scope, the SMS Light Phaser, the Genesis Menacer, etc. Of course there was some third party gun but the were mostly crap, except the Konami stuff.

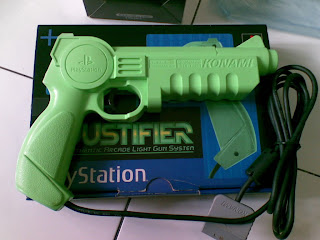
Konami came up with the Justifier in the SNES/Genesis era and created a second iteration of the gun for the Playstation. The gun looks great except for one thing : it light green. The kind of green your face get when you're sick. Other than that, it looks cool, not too heavy and has a nice grip. I tested it with Project: Horned Owl, the only game that I have that is compatible with that gun, at least to my knowledge.

The game controls are simplified by the gun's lack of buttons. You have the trigger, an action button and a Start button. Nothing else. That doesn't mean the game is lacking in any way. Just don't expect any crazy button combos.

The game was designed by Masamune Shirow and it shows. All cut scenes are drawn in the style that Shirow is famous for. Really Ghost in the shell like. You basicaly fighting off an alien invasion in a mecha that holds a giant gun. That concept won't rewrite history but it serves it purpose: shoot anything that move (except small civilian).

The gun work fine with the game except that you don't have a crosshair. You really have to know where you are pointing your gun or you'll die pretty quickly.

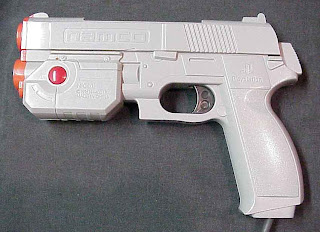
Moving on to the most popular gun controller, the Guncon. Made by Namco for the popular Time Crisis games (and many others too), this is the most real looking gun made, in its PS1 iteration. The orange PS2 version kinda breaks the mood. Same amount of buttons here but the A and B placement makes it harder to remember which is which as they are placed on either side of the gun, at the front.

I first intended to innovate a try the controller with a lesser known title: GUNFIGHTER: The legend of Jesse James. The story glorified a criminal, the graphics were bad for the system and the movement (of both the main character and the bad guys) didn't make a lot of sense.

I died 4 times before giving up, as I figured I was still far from clearing the first stage. I don't recommend that game. So I went with a sure bet, Time Crisis, the original. What I like about Namco gun games is that they have a calibrating screen, which was missing in the previous 2 games. Now it's included in all the game but I think game designers didn't see it as a necessity at the time.

The gun responded well in the game even tho you still don't have a crosshair. It's less inconvenient since the controller was calibrated before.

I shouldn't really compare the 2 guns, as each of them is compatible with a different set of games. The Guncon enjoyed a better life as it is now in its 3rd iteration on the PS3 and can be use with LCD and plasma screens. The Justifier life ended with the PS1. So the Guncon still wins in the long run but I'd say that if you get your hands on a Justifier, I would recommend checking out the games that were made for it.

Monday, March 22, 2010

JogCon vs NeGCon, which one is the best/weirdest

From now on, I’ll try to blog at least once a week about gaming, mostly about retro-gaming and obscure gaming subjects.

Even tho blogging is supposed to be out compared to Twitter and Facebook, I consider this as a writing exercise. And maybe I can interest some people in that stuff.

Recently, I’ve been able to get my hands on a Namco NeGCon controller. Back in the PS1 era, Namco had a popular racing game series called Ridge Racer (which still exists to this day but has been less high profile in the recent consoles). It is more of an arcade racer than a simulation, like Gran Turismo and Forza. We’re talking high speeds and drifts that don’t make any sense. I already had some Ridge Racer titles, including a special edition of Rige Racer Type 4, which came with the JogCon.

First up was the NegCon with Ridge Racer (RR1), the first, straight port of the arcade. Right of the bat, I must say the controller is really simple and when playing, only 2 buttons are used (even if while playing RR1, I used only one): Acceleration and Brakes. Even better, they are pressure sensitive, which was pretty unusual in the PS1 days.

One thing hits you when first play with the NegCon: you have no idea of the how far you have to twist to turn the way you like and you are clueless on which direction you car will take on the first turn. You either get it right or you hit the opposite wall. Once past the first turn, you’ll need a race lap to get the hang of it. The twist motion becomes natural and is insanely precise. I even had a friend who is more of a sport gamer (mainly baseball, basketball, and football) and he had a pretty good first race and finished second. He actually liked how the controller worked!

While he was there, we decided to test the JogCon. First issue: early PS1 games are not compatible with it. Since it came with Ridge Racer Type 4 (RR4), we decided to test the controller with it. Then you have to find a comfortable position for your hands to use the dial while still firmly holding the controller. A good point: the force feedback is really strong when you take into account the size of the controller. It’s big for a PS1 controller but nothing excessive.

The learning curve with this controller is much bigger than the NeGCon. The force feedback really messes with the way a person would normally play those games. You hold the dial with 3 fingers max. This is not a full steering wheel with force feedback that you hold with 2 hands. The first time the force feedback kicks, the dial almost jumps out of your hand. It’s weird at first, then you try to drift and it gets just plain awkward. The force feedback will kick in one, direction then the opposite, then back again when trying to get the car straight. To perform, you must not make any mistakes, not even the slightest one.

I can see myself getting used to that controller but it would take time. Time that I don’t have considering that I don’t specialize in drift racing games. I don’t feel like spending 2 hours to master a track in a Ridge Racer, assuming it is one that is compatible with it. I haven’t tested it with other titles, but I’m fairly sure that not a lot of titles were compatible with the JogCon.

The NegCon on the other hand seem to work with pretty much any racing game. To make the test even, I tried the Grand Prix mode in RR4 and finished it within an hour and only had to redo one race (finished second and had to finish first in that one).

Not long after finding a NeGCon, I read on a gaming forum that playing with it was bliss. I had trouble believing that because, let’s be honest, it looks like a broken controller. It twists right in the middle! How weird could it be to play with it? I believe now and will challenge anyone to try it and see for themselves.

Both pictures are from www.joypadgame.com. I do not own them, they just had the best picture of the controllers.